It has become evident that I've transitioned away from knitting over the past year or so. Although I learned to knit when I was fairly young, I think knitting became a big part of my life when I was in law school. Portability was a definite plus, but knitting was also a good stress reliever that helped me through some difficult times. Non-knitters might never know how absorbing knitting can be, as (for me anyway) it took quite a bit of concentration. It was/is a good stress reliever.
Don't get me wrong, I still love yarn and the process of knitting, but I don't feel compelled to knit as I once did. Part of it, too, is that I'm finally feeling like I no longer have all the time in the world to get to that next project, or finish the half-dozen that are already on the needles. And, I've gone back to sewing, which is actually where it all started for me.
With that, I'm leaving this blog for a new one that more aptly fits the content of what I've been writing about and doing. The new blog will have all the old content, but you just need to visit a different site. So, here it is: elvycrafts.blogspot.com
Saturday, December 18, 2010
Thursday, December 2, 2010
Curvy wristlet clutch and more wallets
I guess I should issue a spoiler alerts. These purses are all intended to be Christmas presents, but I know that if I don't blog about them as I go along, I'll miss my opportunity. Also, it's unlikely the intended recipients will actually read this blog.
Anyhoo, this is the curvy clutch. The pattern is, as with the previous Keyka Lou patterns, very well drafted and easy to construct. I should note that I have been using a walking foot and a 100/18 needle, which probably makes sewing through the several layers of fabric that accumulate much easier to do.
This wristlet is about the same size as the fold-over clutch, measuring approximately 11 inches at its widest point, five inches tall, and 2.5 inches deep. It features a very secure wrist strap.
 Fussy cut motif on both the front and back:
 The fabric is from Amy Butler's Lotus line.
 The matching wallet:
 Again, I fussy cut the fabric to center and include as much of the repeating motif as possible:
 The only difference between this wallet and the one I made to match the previous fold-over clutch is that I interfaced the front pocket instead of using a batting in order to eliminate some of the bulk. I think the double interfacing provided enough structure, so I will continue doing this in the future.
 Here they are side by side:
 Last but not least, the basic wallet for the hubby's i-phone. It might be hard to tell from the picture, but I used this absolutely lovely, crisp brown linen that I had bought a while back for a summer jacket. I figured I could spare the fat eighth it took to make this wallet. (The quality of these last two pictures is a little bit off -- I think my camera was metering the darkness of the brown linen, and I didn't know how to fix the automatic setting.)
 The lining is a gingham by Michael Miller:

As a final thought (and in case anyone is interested), the background fabric I have been using for these pictures is from Summer Soiree collection by Paula Prass for Michael Miller.
Anyhoo, this is the curvy clutch. The pattern is, as with the previous Keyka Lou patterns, very well drafted and easy to construct. I should note that I have been using a walking foot and a 100/18 needle, which probably makes sewing through the several layers of fabric that accumulate much easier to do.
This wristlet is about the same size as the fold-over clutch, measuring approximately 11 inches at its widest point, five inches tall, and 2.5 inches deep. It features a very secure wrist strap.
 Fussy cut motif on both the front and back:
 The fabric is from Amy Butler's Lotus line.
 The matching wallet:
 Again, I fussy cut the fabric to center and include as much of the repeating motif as possible:
 The only difference between this wallet and the one I made to match the previous fold-over clutch is that I interfaced the front pocket instead of using a batting in order to eliminate some of the bulk. I think the double interfacing provided enough structure, so I will continue doing this in the future.
 Here they are side by side:
 Last but not least, the basic wallet for the hubby's i-phone. It might be hard to tell from the picture, but I used this absolutely lovely, crisp brown linen that I had bought a while back for a summer jacket. I figured I could spare the fat eighth it took to make this wallet. (The quality of these last two pictures is a little bit off -- I think my camera was metering the darkness of the brown linen, and I didn't know how to fix the automatic setting.)
 The lining is a gingham by Michael Miller:
As a final thought (and in case anyone is interested), the background fabric I have been using for these pictures is from Summer Soiree collection by Paula Prass for Michael Miller.
Monday, November 29, 2010
Fold-over clutch
The design for the fold-over clutch is just so clever. This might be my favorite project to date:
 The clutch measures about 11 inches wide at its widest point. Closed, as above, it is about six inches tall. Opened, as below, it is 11 inches tall (including the tab).
 The fabric is Amy Butler's daisy chain, left over from a previous project. I reversed the outer and lining fabrics in comparison to the matching wallet that I blogged about yesterday.
 I might attach a button here, just for a decorative element. But, I think it looks good just as is, too. Next time, I would also put the batting on the underside of tab to provide extra support for the magnetic clasp. The pattern had called for fusible interfacing on the lining side, and batting on top side.
 Once again, I quilted the lining fabric with a low-loft cotton batting using a box diamond pattern. It's not completely necessary, but I wanted to add some stability and didn't want to take the chance that the batting would eventually migrate. The pattern recommends not using fusible interfacing, but I did use a woven interfacing on the main fabric. I'm thinking that I could have probably used a fusible batting too. Maybe next time.
 The pocket is on the front side of the clutch, not the back as standard. The patternmaker, Keyka Lou, wrote that the pocket tended to gape when it was on the back side.
Sunday, November 28, 2010
Basic wallet
This wallet was also a lot of fun to make. Once again, it is a Keyka Lou pattern. I used Amy Butler's daisy chain fabric, left over from a previous project. The wallet is approximately 5.5 inches wide by 4 inches tall and is actually much roomier than I thought it would be.
 As you can see, there is a little card pocket in the front:
 I centered the motif in the back and front panel. I love how it turned out.
 The velcro closure is actually quite sturdy and secure...
 and my i-phone fits in the interior pocket perfectly. It doesn't even fall out when I turn the wallet upside down and shake it.
 The interior and my label:

Stay tuned tomorrow for my post regarding a matching clutch that turned out even cuter than the wallet!
 As you can see, there is a little card pocket in the front:
 I centered the motif in the back and front panel. I love how it turned out.
 The velcro closure is actually quite sturdy and secure...
 and my i-phone fits in the interior pocket perfectly. It doesn't even fall out when I turn the wallet upside down and shake it.
 The interior and my label:
Stay tuned tomorrow for my post regarding a matching clutch that turned out even cuter than the wallet!
Friday, November 26, 2010
How cute is this?!
I love it! It's called the Camera Case Wristlet, pattern by Keyka Lou. The pattern is available for purchase and immediate download here: keykaloupatterns.com.
 It took me a few hours from start to finish, but some of that time was spent studying the instructions and following them exactly (which is somewhat unusual for me). The pattern itself is very well drafted and instructions well-written. The bag measures 4.75 inches wide, by 4 inches tall and 1/5 inches deep. My favorite part is the very clever wristlet string.
The only modification for me was that I quilted the lining fabric in a diamond grid; I thought it would provide a little more support, but I'm thinking it was entirely unnecessary. However, it does add some interest to the lining, which I like very much. The best part is that the pattern calls for 1/4 yard (9 inches) of fabric each for the main fabric and lining, but can get away with a piece of scrap fabric measuring at minimum 12 inches wide by 8 inches tall. Of course, if you want to fussy cut any of the pieces, you will need more than the 12x8 piece.
 The fabric is some left over scraps, which I used to make an apron way back when. The outer fabric is Anna Griffin for Windham fabrics called Maime. I tried to fussy cut the fabric so the motif was centered -- I think I mostly succeeded. You might not be able to tell from the picture, but there is a little pocket in the back, which is a neat little detail.
 The brown polka dot lining is a Japanese fabric called Sevenberries. The lining fabric is especially scrumptious. It's smoother and lighter than the average quilting fabric. You can't see from the picture, but the polka dots are so rich in hue that they bleed completely through the back.
Monday, November 15, 2010
Dear Jane mug rug
Many months back, this was my first attempt at a Dear Jane block. At the time, I hadn't set an accurate 1/4-inch seam yet, so the block turned out much smaller than called for. You can see with 29 pieces in this block alone, even 1/16th of an inch inaccuracy makes a big difference.
This weekend, I turned it into a little coaster, just for fun, and because the block itself is so cute.


This weekend, I turned it into a little coaster, just for fun, and because the block itself is so cute.


Sunday, November 14, 2010
Winter hats
I haven't been doing too much knitting lately. I seemingly lost my zest for knitting last spring and summer. I don't know if it was the change to warmer weather, but I still haven't regained the enthusiasm I once had for knitting. I once jokingly commented to my husband that I had more yarn than I could knit in a lifetime, and I think that it hit me this past year: yes, I do have more yarn than I will ever knit up, at least in MY lifetime. Sort of a bittersweet acknowledgment of mortality, I guess.
Even so, I am not one who can sit with my hands idle, so I did manage to complete two hats. The one below is from the latest Knitty.com (Fall 2010, Issue 33) and is called "Brambles." It was super easy and quick -- took me a few evenings of knitting. I used a worsted weight alpaca/wool blend yarn by Berrocco.

This next one took a bit longer. I actually started it last spring in an attempt to motivate myself but it just never happened. Anyhow, this fall I forced myself to complete it. The pattern itself was easy -- from Vogue Knitting Magazine (Fall 2009) but because the pattern called for fingering weight yarn, it took much longer to complete. The yarn is Colinette's jitterbug.

Both hats are destined to be gifts, most likely. I always plan on knitting one for myself, but the reality is that I'm not a hat person. Plus, for some reason, my almost-4-year-old always demands I remove hats and scarves when I put them on. Funny.
Friday, November 12, 2010
What I've been doing
I took a break from quilting to make winter flannel pajamas for the boys. So I've completed three pairs and have one more to go. Here is the best of the lot so far:


The pattern is Indygo Junction's Jack & Jill Jammies (IJ842). I modified the pattern by adding a 1/4" flat piping to the collar, pocket, and cuffs. I love how it turned out, and the jammies look super cute on #2. The one thing I might change on the next pair is to round out the collar to make inserting the piping a little easier. We'll see You can also tell I'm still on my aqua/blue and red kick. I love this color combination.
BTW, the fabric is Hooty Hooty by Doohikey for Riley Blake Designs. It's a nice scrumptious flannel that will wear very well.
Monday, October 18, 2010
Bridal Sampler, Blocks 3 - 5
 Progress on the Bridal Sampler has been stalled by work on the Blissful Sampler, so these blocks have been finished for quite a while now. The top row is my scrap box pieces, and the second row is my Breakfast at Tiffany's bundle.
 By far, the funnest block was the "posies" block in the middle. The flowers at each corner are machine appliqued using fusible web with the edges raw. I'm sure this might make some quilters gasp, but applique is definitely not my favorite. The third block, the star one, had alternate construction methods. The first one was paper piecing. I liked the preciseness of paper piecing, but I wasn't too fond of the center seams. The second method was method was just piecing. Although the streams do not have that nice crisp look, I do like how the center block is uninterrupted.
Tuesday, October 12, 2010
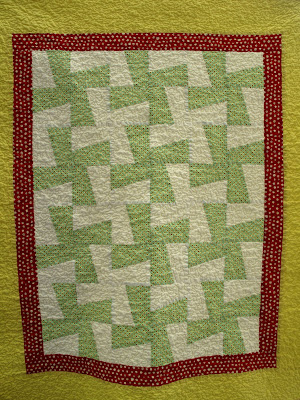
Scrappy Hunter's Star -- almost finished!
I thought I would go ahead and post the almost-finished quilt top, as I think I am running out of steam on this one. I might have to put it away for a while before taking it up again. It lacks a final border, which is in a dark green floral. I say that I might put it away for a while because I am not liking how the two inner borders came together. Plus, I really stretched out one of the sides while piecing it and am thinking of ripping both borders out to start again.

The details: the fabric is Origins by Basic Gray for Moda. The pattern is from "A Baker's Dozen," from the staff of That Patchwork Place. The pattern is kinda neat in that the entire quilt is made from a combined layer cake and jelly roll and measures about 85" x 85" when finished. Almost all the fabric with a few odds and ends are used. I'll post the directions for the blocks at a later date. As you can see, most but not all my points and corners matched up. But, the various prints are interesting enough that I think I can get away with it. One of these days I will have a precisely pieced top. :)


The details: the fabric is Origins by Basic Gray for Moda. The pattern is from "A Baker's Dozen," from the staff of That Patchwork Place. The pattern is kinda neat in that the entire quilt is made from a combined layer cake and jelly roll and measures about 85" x 85" when finished. Almost all the fabric with a few odds and ends are used. I'll post the directions for the blocks at a later date. As you can see, most but not all my points and corners matched up. But, the various prints are interesting enough that I think I can get away with it. One of these days I will have a precisely pieced top. :)

Tuesday, October 5, 2010
Sneak Peak
This is what I am currently working on. The fabric is Bonnie and Camille's Bliss for Moda. Can you tell by now that I love Moda? I especially love this line of prints and colorways. The big dilemma is which ones to buy, lots of turquoise, red, pink, brown, and green in this collection.


The Hunky Dory Snowballs
This is another quilt top I pieced over the summer. I love, love, love, the prints -- they're from Chez Moi's Hunky Dory for Moda. I bought it as a kit from Fabric Depot, but the pattern is available for free on Moda's website. It's just difficult for me to find the full range of prints called for in the pattern.
 The construction itself was simple. It starts as an 8" x 8" square, fitted with 2" squares sewed into the corners into triangles, and then cut in half for the snowball. I do like the effect of the center panel. Interestingly, the center panel was the most difficult to cut, because I just couldn't get the fabric and pattern to form a straight line for cutting. Plus, the dimensions called for were bigger than any ruler I owned. I ended up making a paper pattern measuring 25" x 25". Each block is then surrounded by 2" sashing.
 Here's a close up of one of the blocks, with my favorite print out of the line. For the backing, I bought the same print, but in a tan colorway.

PS. I should have ironed the quilt top before the photo shoot!
 The construction itself was simple. It starts as an 8" x 8" square, fitted with 2" squares sewed into the corners into triangles, and then cut in half for the snowball. I do like the effect of the center panel. Interestingly, the center panel was the most difficult to cut, because I just couldn't get the fabric and pattern to form a straight line for cutting. Plus, the dimensions called for were bigger than any ruler I owned. I ended up making a paper pattern measuring 25" x 25". Each block is then surrounded by 2" sashing.
 Here's a close up of one of the blocks, with my favorite print out of the line. For the backing, I bought the same print, but in a tan colorway.
PS. I should have ironed the quilt top before the photo shoot!
Crazy Pinwheels for #2
This is the quilt top I pieced for #2. It's been finished for awhile, but I'm still working out in my head how I want to quilt it -- and figuring out the logistics of the execution given my rather small Necchi.

Just a few comments on the construction. I did not use a pattern, but started with 5" squares that I made into HST (half-square triangles) and then trimmed to 4.5". The final quilt top measures about 50" x 80".
As you can see from this image below, I did get most (but not all) of the points to align.

Wednesday, September 15, 2010
Bridal Sampler, Blocks 1 & 2

I've collected so many bits and pieces of fabric that I thought it would be fun to use them in a sampler quilt. I first started a "Dear Jane" quilt, but it turned out to be too challenging for my present skill set. I will post the 9 blocks (out of 250+) I was able to complete. If you google "Dear Jane," you'll find a lot of information out there, but basically it is a reproduction quilt using different 4.5-inch blocks and bordered by triangle blocks. The entire collection of blocks is compiled in a book by Brenda Manges Papadakis. While the book contains a full-size diagram of each block, there are no instructions on how to put the blocks together, which again, was too advanced for me. I still hope to try again someday.
Undaunted, however, I picked up two other books, "The Farmer's Wife Sampler Quilt," by Laurie Aaron Hird, and "Sylvia's Bridal Sampler from Elm Creek Quilts," by Jennifer Chiaverini. The first is composed of 111 6-inch blocks, and the second is a collection of 140 6-inch blocks.
I chose to try the Bridal Sampler first, primarily because the book contained detailed instructions on putting the blocks together. Plus, depending on the block, you can try your hand out both piecing, foundation paper piecing, and applique-ing (my least favorite). The Farmer's Wife is straight piecing and contains a CD with templates to print out on paper.
So, here is my attempt at the first two blocks from the Bridal Sampler. Of course, I have to make it a little more complicated. I figured if I made each block individually, it wouldn't take me too much more time to make two of each, thereby ending up with two sampler quilts. Further, one I am making out of fabrics from my scrap basket, but again I figured that if I was going to spend so much time (in the aggregate) on a project, I wanted one that used coordinating fabrics. So despite myself, I picked up a FQ pack (Breakfast at Tiffany's by Fig Tree for Moda) from Fabric Depot. The top picture is a scrap blocks, and the following is my Fig Tree block:

Catching up

Wow, the summer passed by so quickly--but, now it's time to play some catch-up. I was somewhat productive but was never able to find the time to photograph and upload any pictures or update this blog. I finished the zig-zag baby quilt, as well as two twin sized quilt tops (including the pinwheels for No. 2). I also started a star quilt as well as a sampler quilt.
I'll slowly try to get the updates on all the above soon, but for now, here is the finished zig-zag baby quilt. It's actually a bit bigger than a baby quilt, but still too small to be considered lap-sized.
Quilting it turned out to be much more challenging than I thought. I decided to follow the zigzag pattern with a double row of stitching. First, my machine is just too small to do any substantially sized quilts that you have to roll up and create bulk. Second, stitching in the ditch with a walking foot attachment is actually much more difficult than I thought it would be. Third, my machine had some problems with keeping an even tension on the bottom bobbin and would sometimes tangle the back thread.
All in all, I still love this quilt, the design and color, but the quilting part is still a steep learning curve for me. This is what I meant when I said stitching in the ditch was difficult, just couldn't stay in the lines:

Corner detail:

Saturday, June 19, 2010
Quilt for #2

The fabric has been purchased, and I have a design sketched out in my head for #2's quilt. I decided to make a quilt for #2 first, because #1 has received many hand-made things whereas #2 has not. I don't dare make clothes or pajamas for #2 because he has very particular preferences at the moment.
All fabrics are Robert Kaufman (purchased at Fabric Depot). From left to right, the first three are Caleb Gray Studio's "Groove," the fourth is Vera's Garden, and the fifth and final is "New Traditions."
Tuesday, June 8, 2010
The second windmill baby quilt is done!
The second windmill quilt is finished and has been packed off for its intended recipient (who is due to arrive any day now). I think I already wrote about the details of this quilt in a previous post. The only piece of information to add is that the free-motion quilting was done with yellow, 100% cotton thread.
 Here is a close up of the border and quilting.
 I bound the quilt with the same Monaluna for Robert Kaufman fabric as I used for the border. The mitered corners turned out very nicely. As with the previous quilt, the border was firts machine-sewed on and then hand-stitched on the back with invisible stitches.
 Next up for quilting is the zigzag quilt. This might be my favorite one yet...
Subscribe to:
Posts (Atom)